Methods for "recording" videos for Canvas assignments

Considerations for Recording new videos

  1. Begin by planning your video and evaluate your resources. See best practices for recording videos.
  2. Choose the the video recording tool best suited for your project. Panopto may or may not be the best solution for recording your video, so the video recording tools you are familiar with may be the best start. 

What types of videos to record for Canvas Assignments

  1. Audio podcasts
  2. Video/audio (head shot)
  3. Computer screen capture (PowerPoint, document or web browsing on your computer). 
  4. Video/Audio + computer screen capture

Choose a recording method and optionally, edit your video.


Submit by Recording with Panopto Capture Web Browser

Use Panopto Capture to record your video assignments. Panopto Capture is a web browser recorder. It's user-friendly and is accessible straight from your Canvas course. The videos are saved in the SMU Panopto Cloud, in the assignment folder for your course. Then, you'll need to submit the video in the Canvas assignment. Use Panopto Capture.
This tutorial consists of two parts:

  1. Record with Panopto Capture.
  2. Insert” and "Submit" a video assignment.

(1) Record with Panopto Capture (video and audio only)

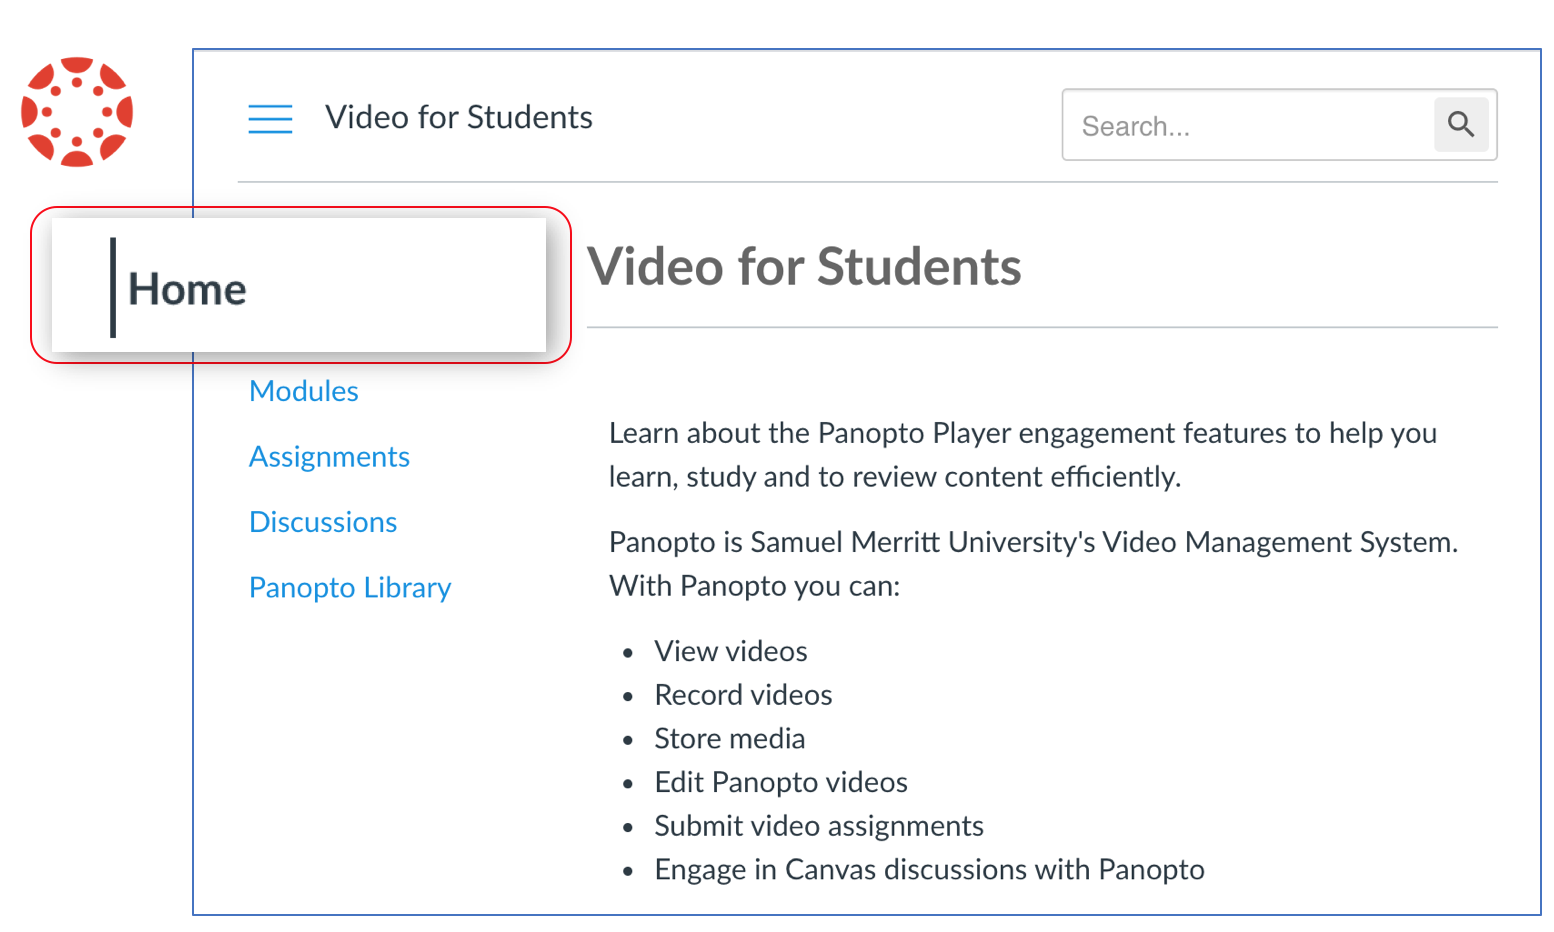
  1. Open your Canvas course.


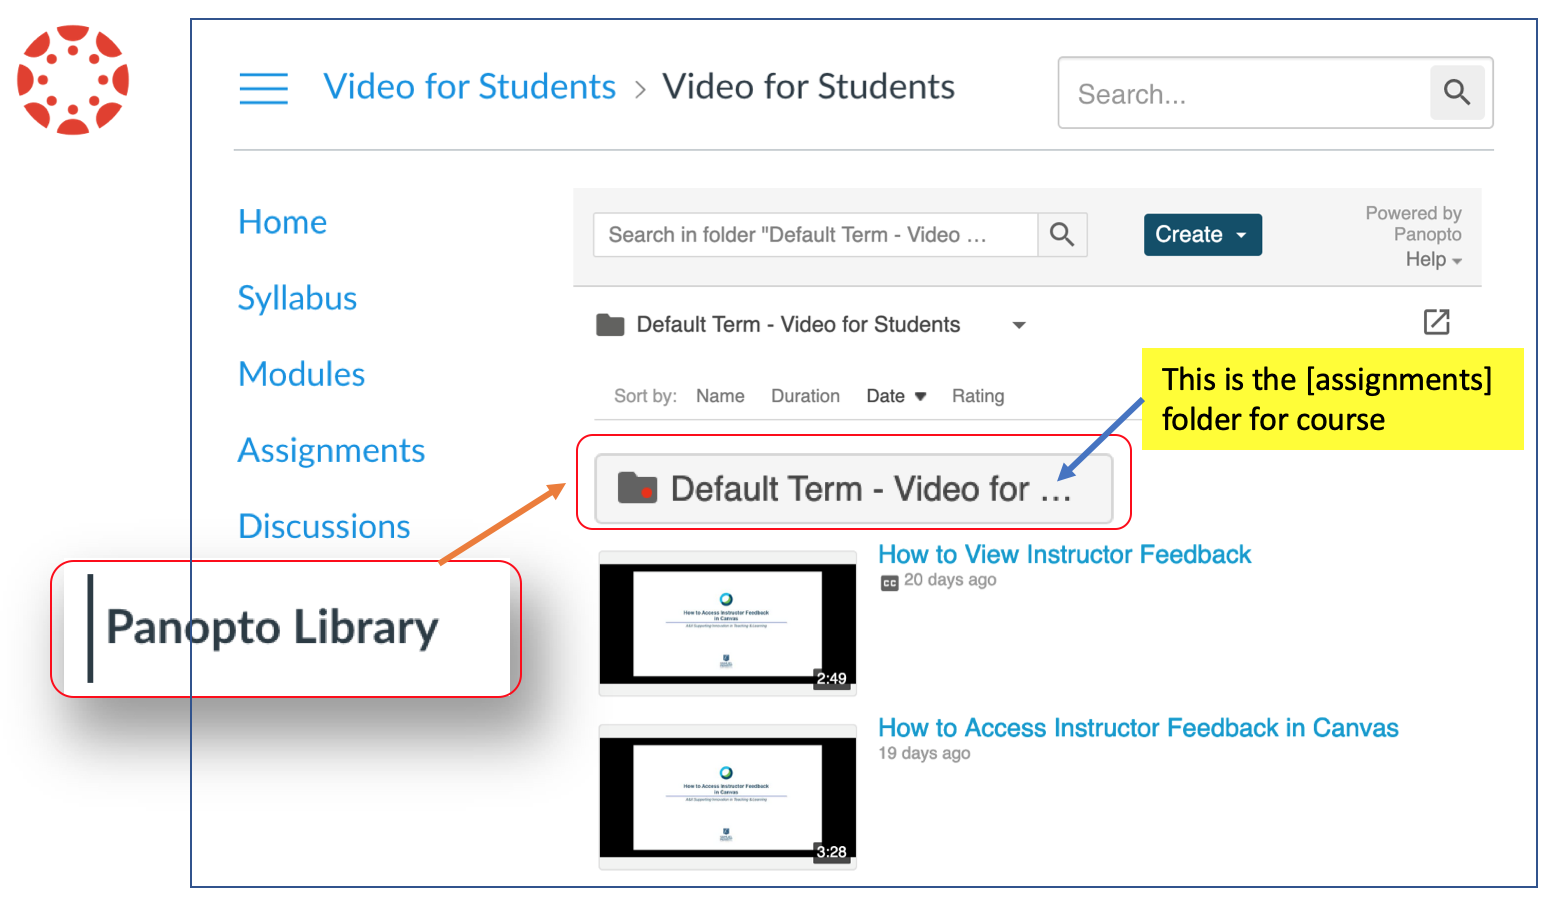
  2. Click the "Panopto Library" tab, then click the Panopto [assignments] folder for the course.


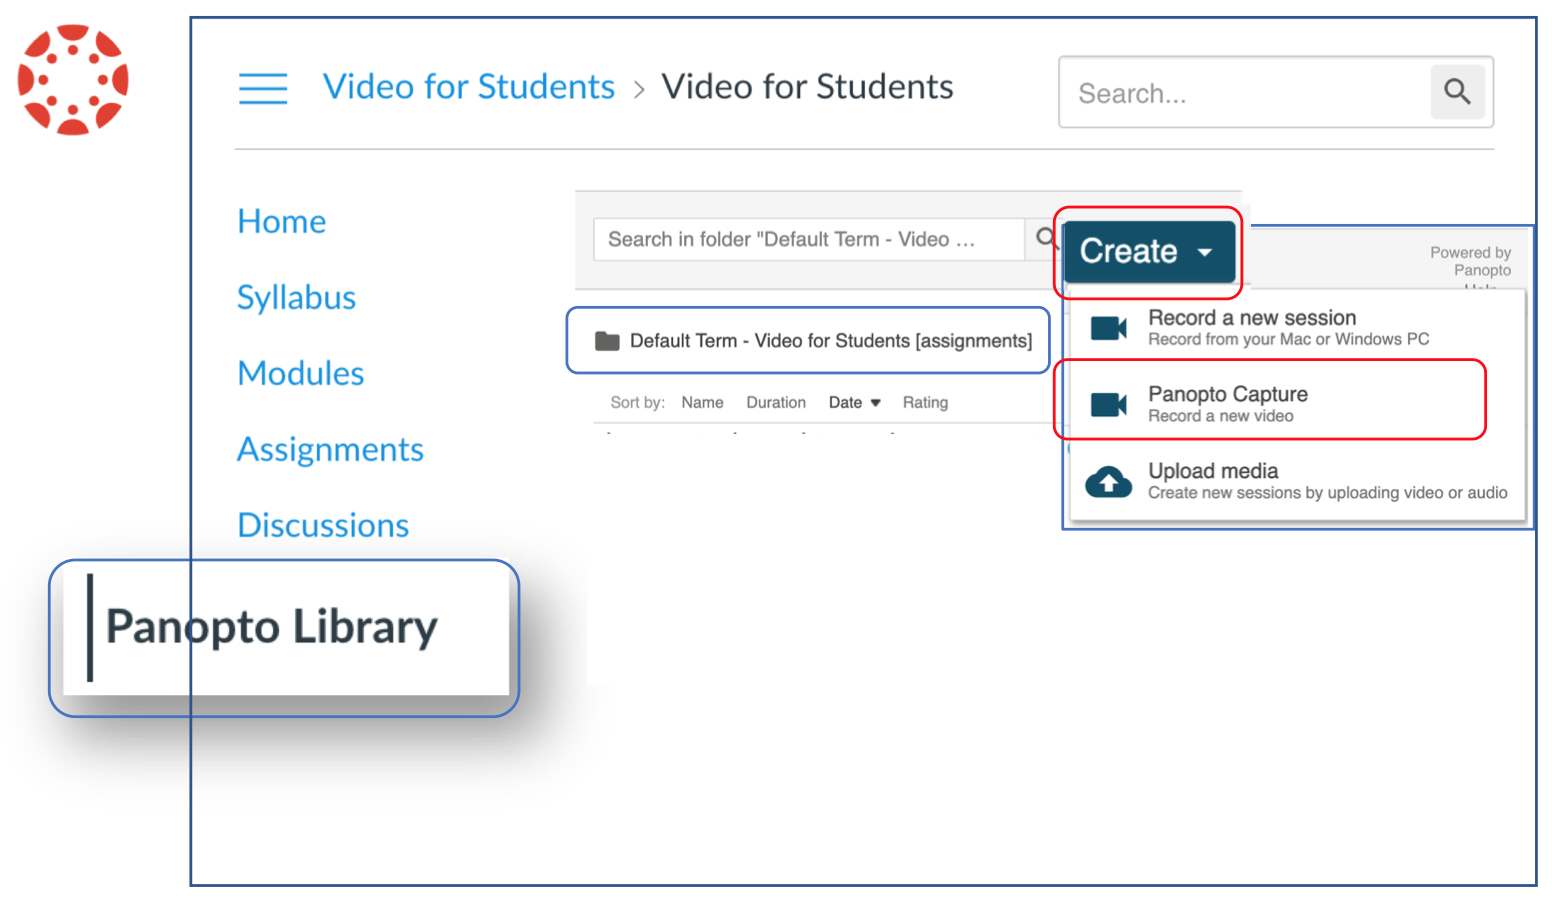
  3. Click the "Create" tab, and choose "Panopto Capture."


  4. For recording video+audio only, enable the mic and webcam. Depending on the browser you will either:

        a) click "Allow".
        b) Or, select  the "mic" and "webcam" icons to enable.​

    You're now ready to record video and audio only.
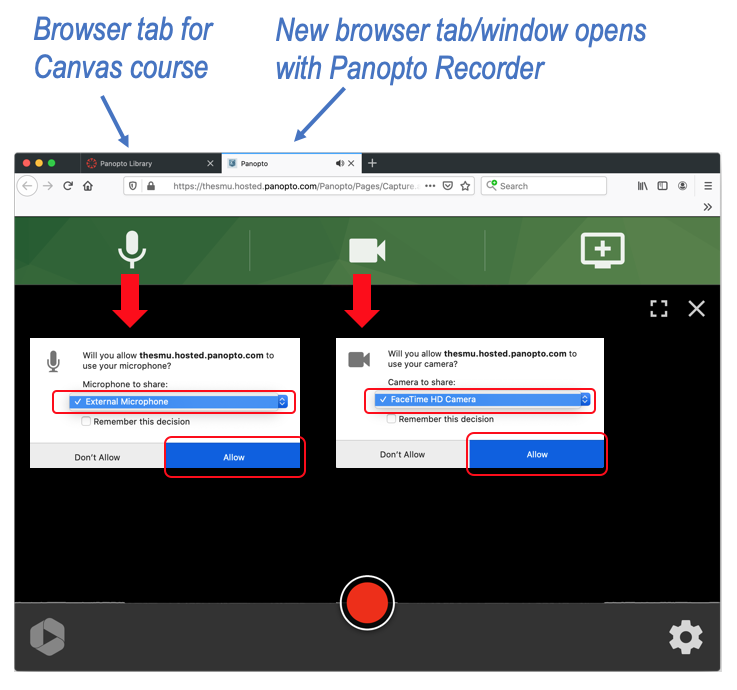


    You are now ready to record video and audio only.
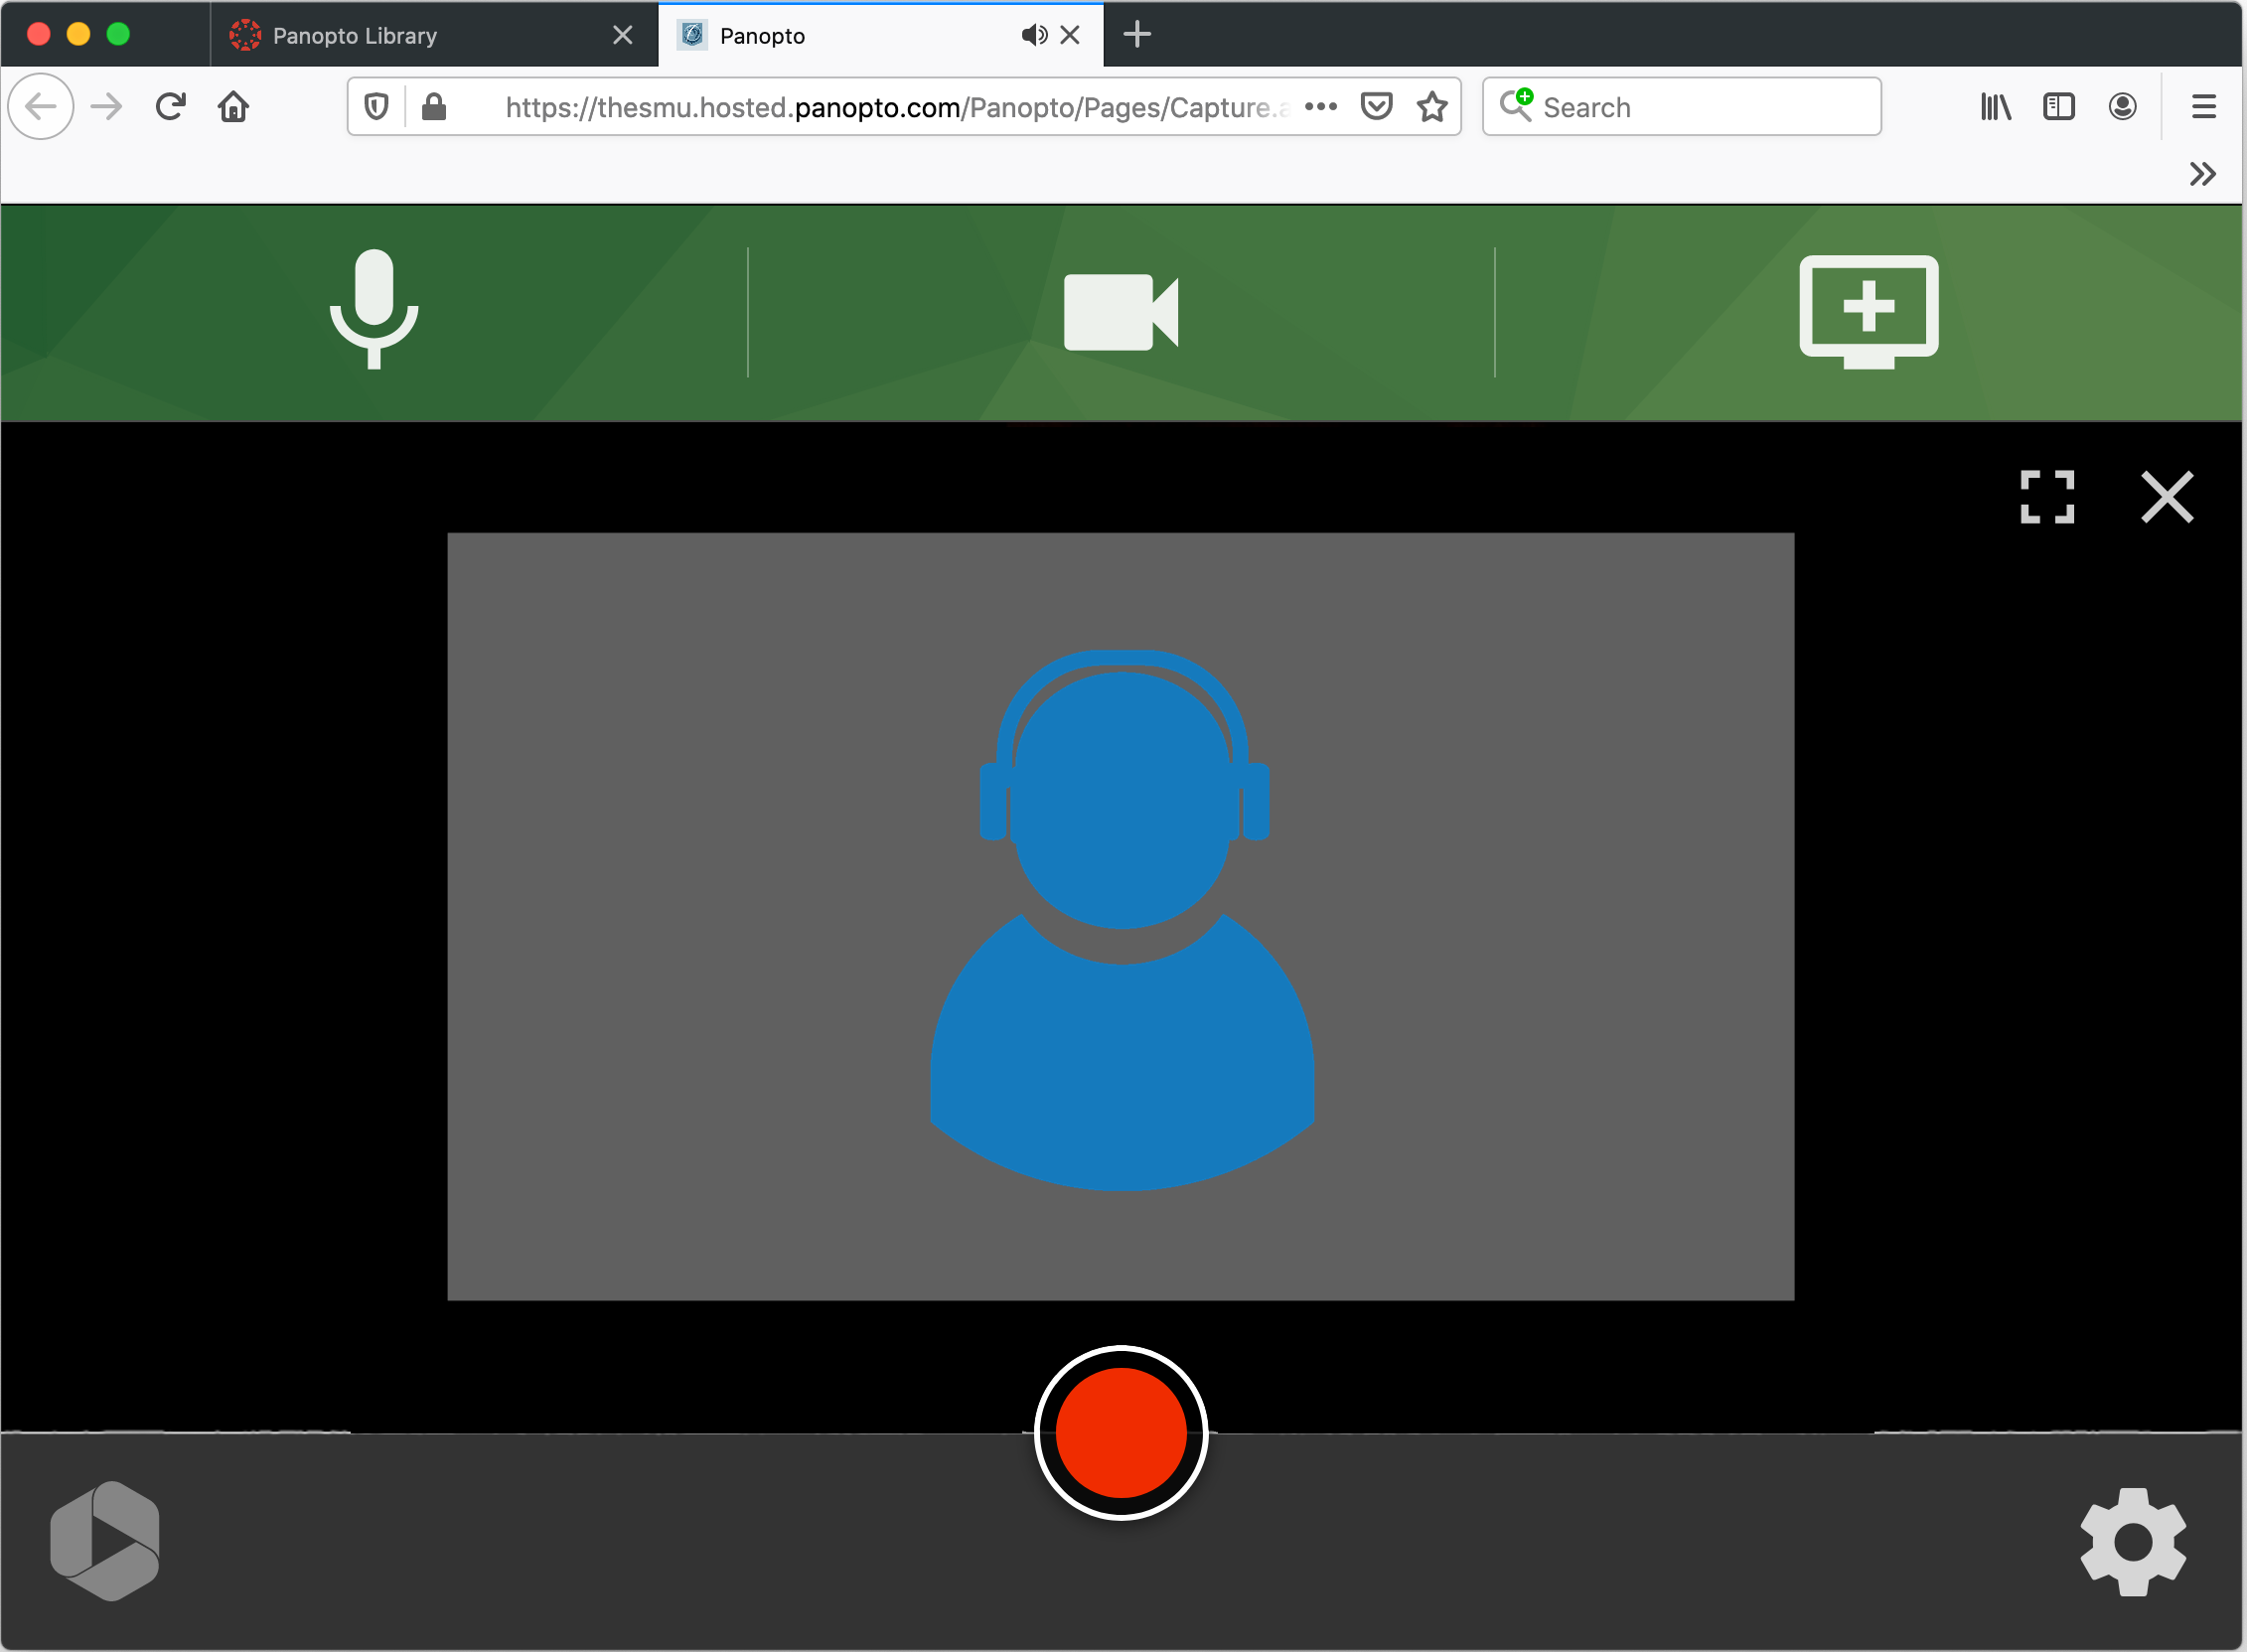


    If you’d like to include screen capture, like PowerPoint, see the accordion section, “record video and audio + screen capture” on this page.
     

  5. Click "Record" to start recording. (smile and wait 5 seconds before you start talking).


  6. Click "Stop" to end the recording. (smile and wait 5 seconds before you click stop).

    .


  7. While you wait for the video to upload, do this:
     
    1.  Type the "title" of your video.
    2. Make sure the video is stored in the Panopto[assignments] folder for your course. If not, click the Panopto folder downward arrow and select the correct Panopto folder.
    3. Wait until you see the "it's okay to close" prompt appears above green status bar . The "okay" means the video is fully uploaded.
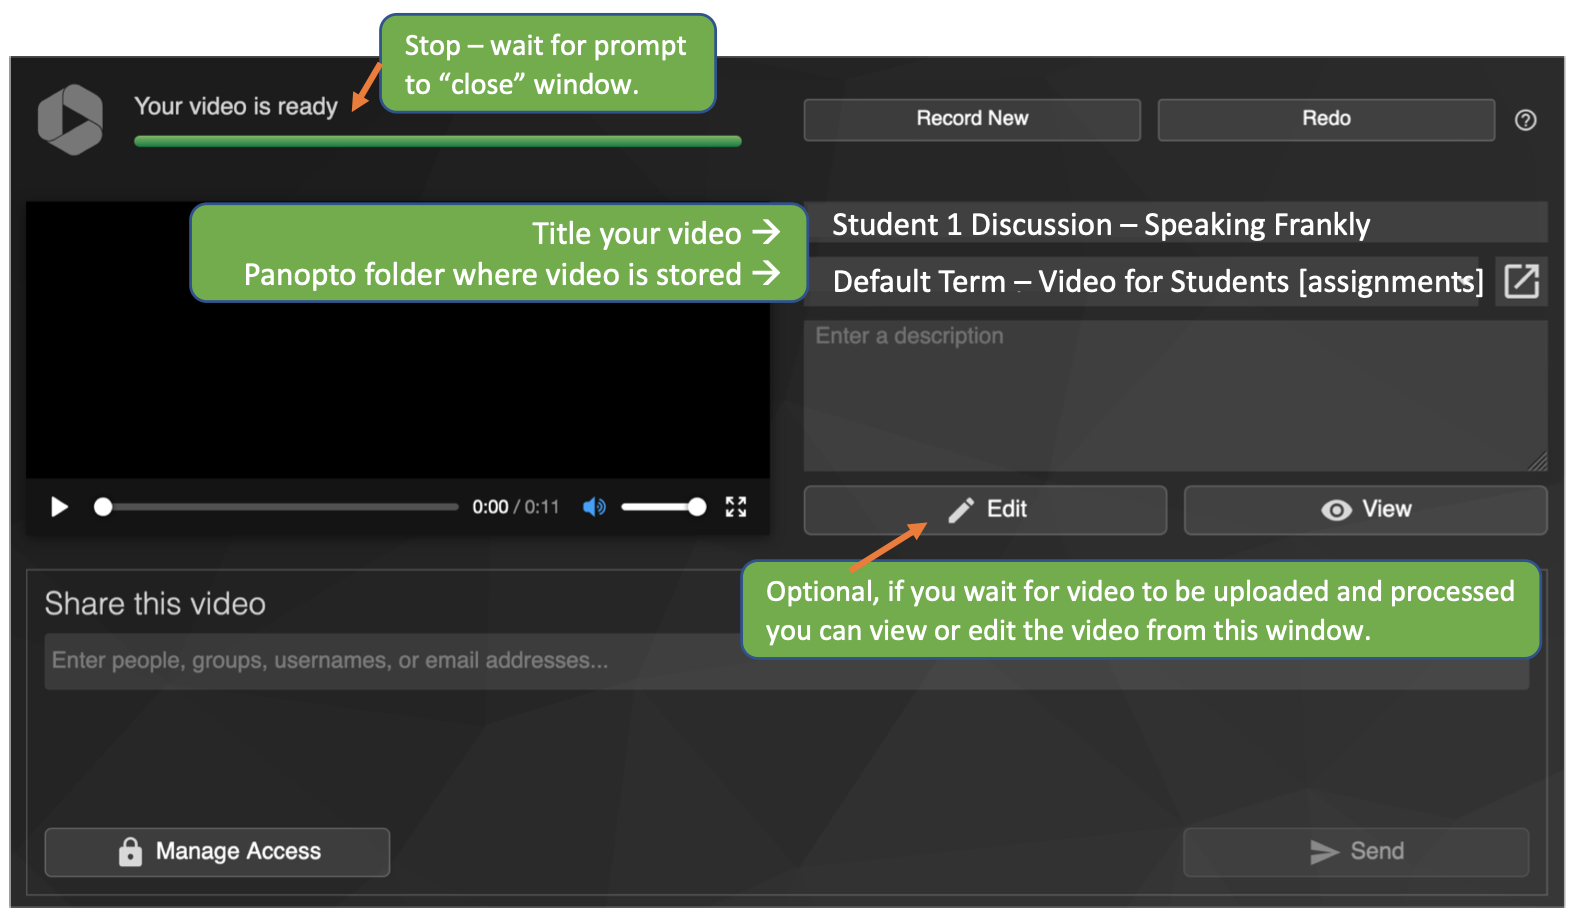


      The recording will be stored in the course Panopto assignment folder.
      Canvas course -> "Panopto Library" tab ->  Assignments sub-folder 


(2) "Submit" the Video Assignment

  1.  Open the assignment.
     
  2. Click “Submit Assignment:”

     
  3. Choose the green Panopto icon in the Rich Content Editor.
    (Note: If not visible, click the three dots to reveal the "Panopto icon". Follow the purple line below.)

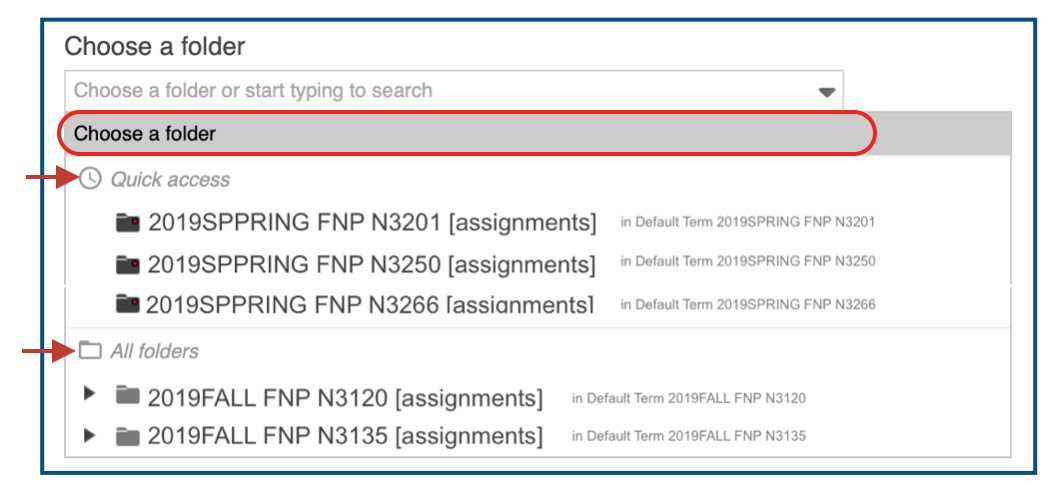
  4. Choose the assignments folder for your course by clicking the dropdown menu:

    The “Quick access” list displays all the assignment folders you’ve accessed recently.
    The “All folders” list displays the assignment folder for each course you’re enrolled in (past or present).
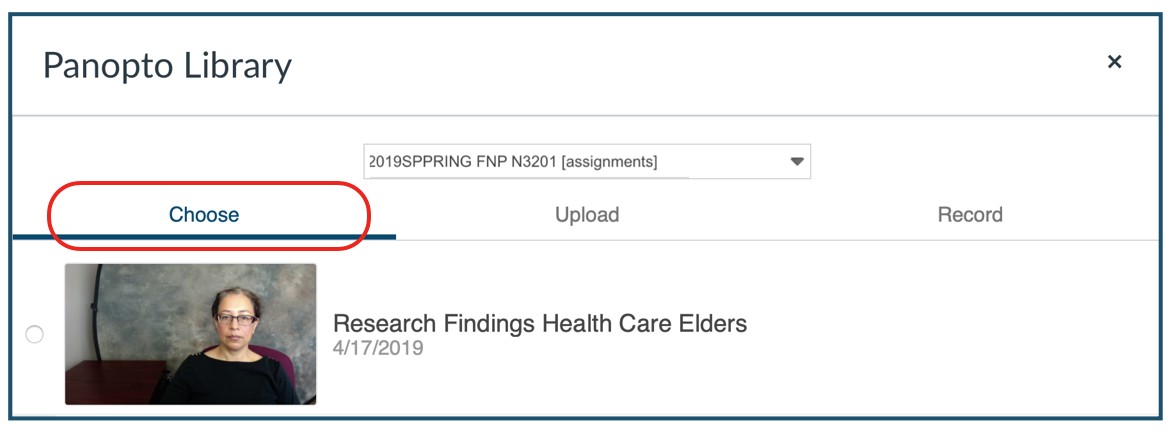
  5. Click “Choose”
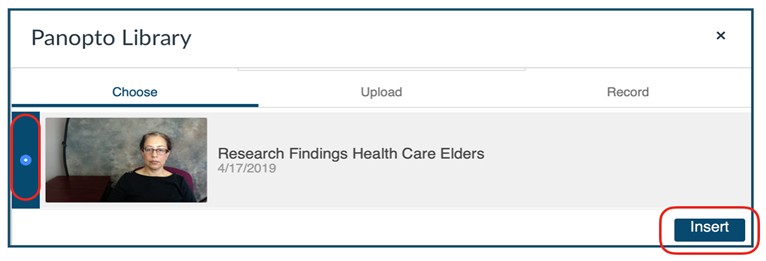
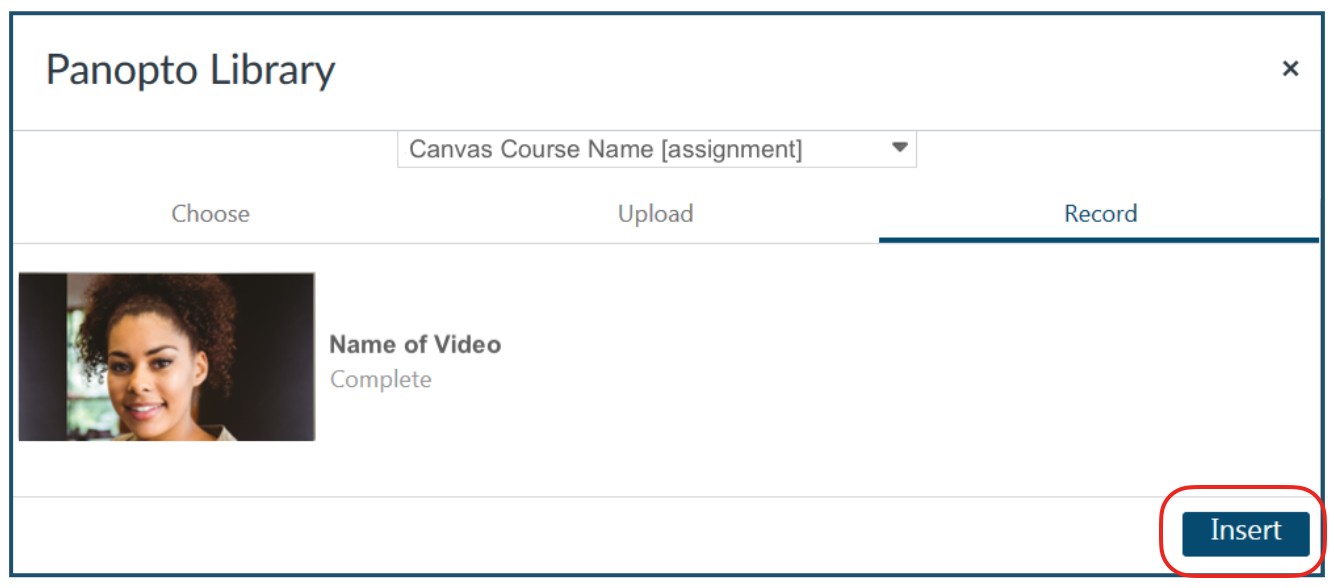
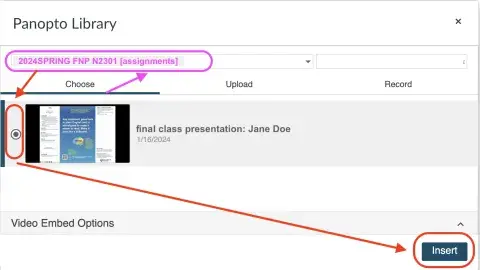
  6. Click the radio button to the left of your video, then click the “Insert” button to send the video to Canvas (you may have to scroll down to see the button):
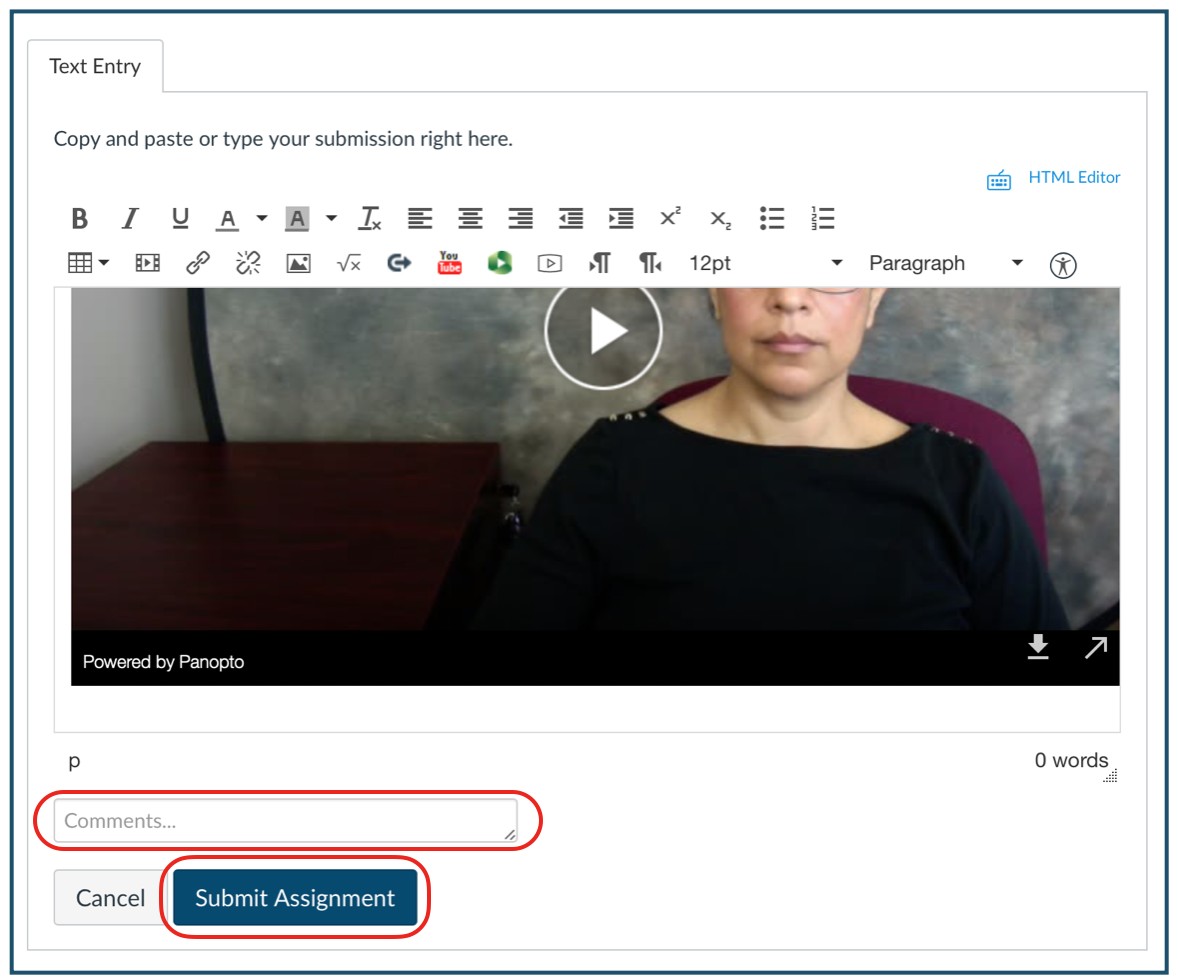
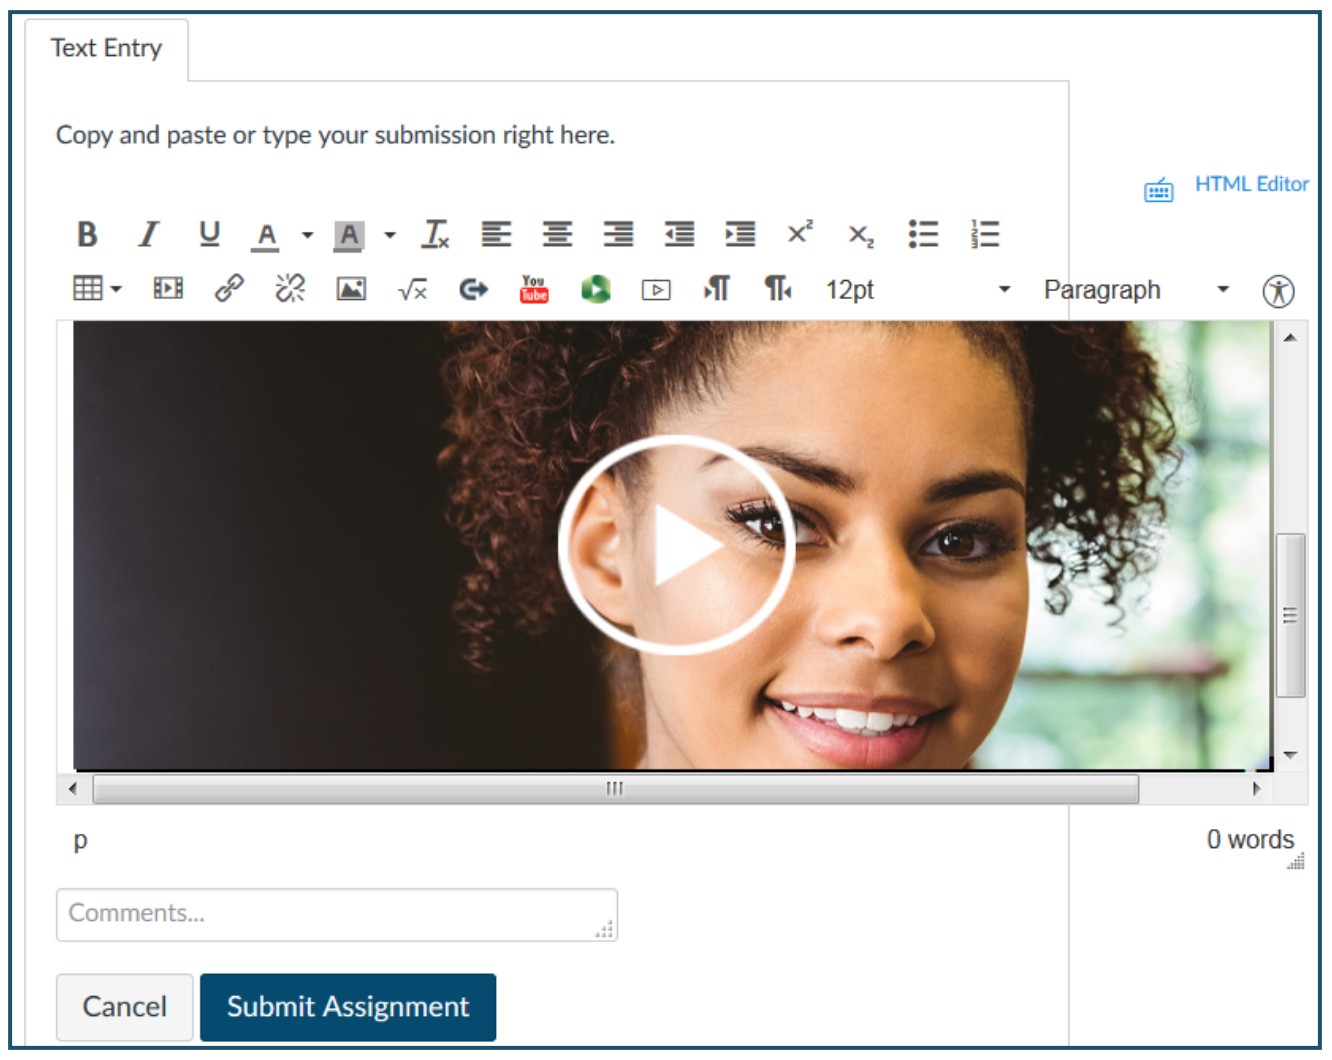
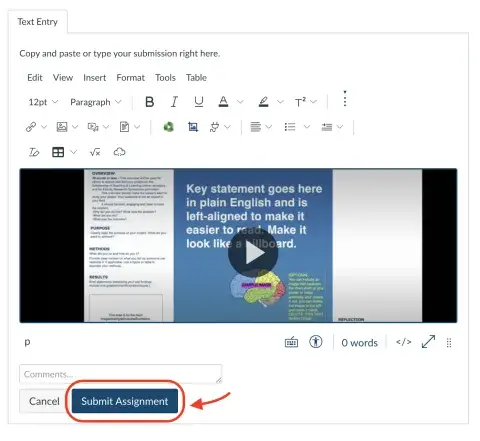
  7. Type a comment or note to your instructor in the “Comments” box, then click “Submit Assignment:”
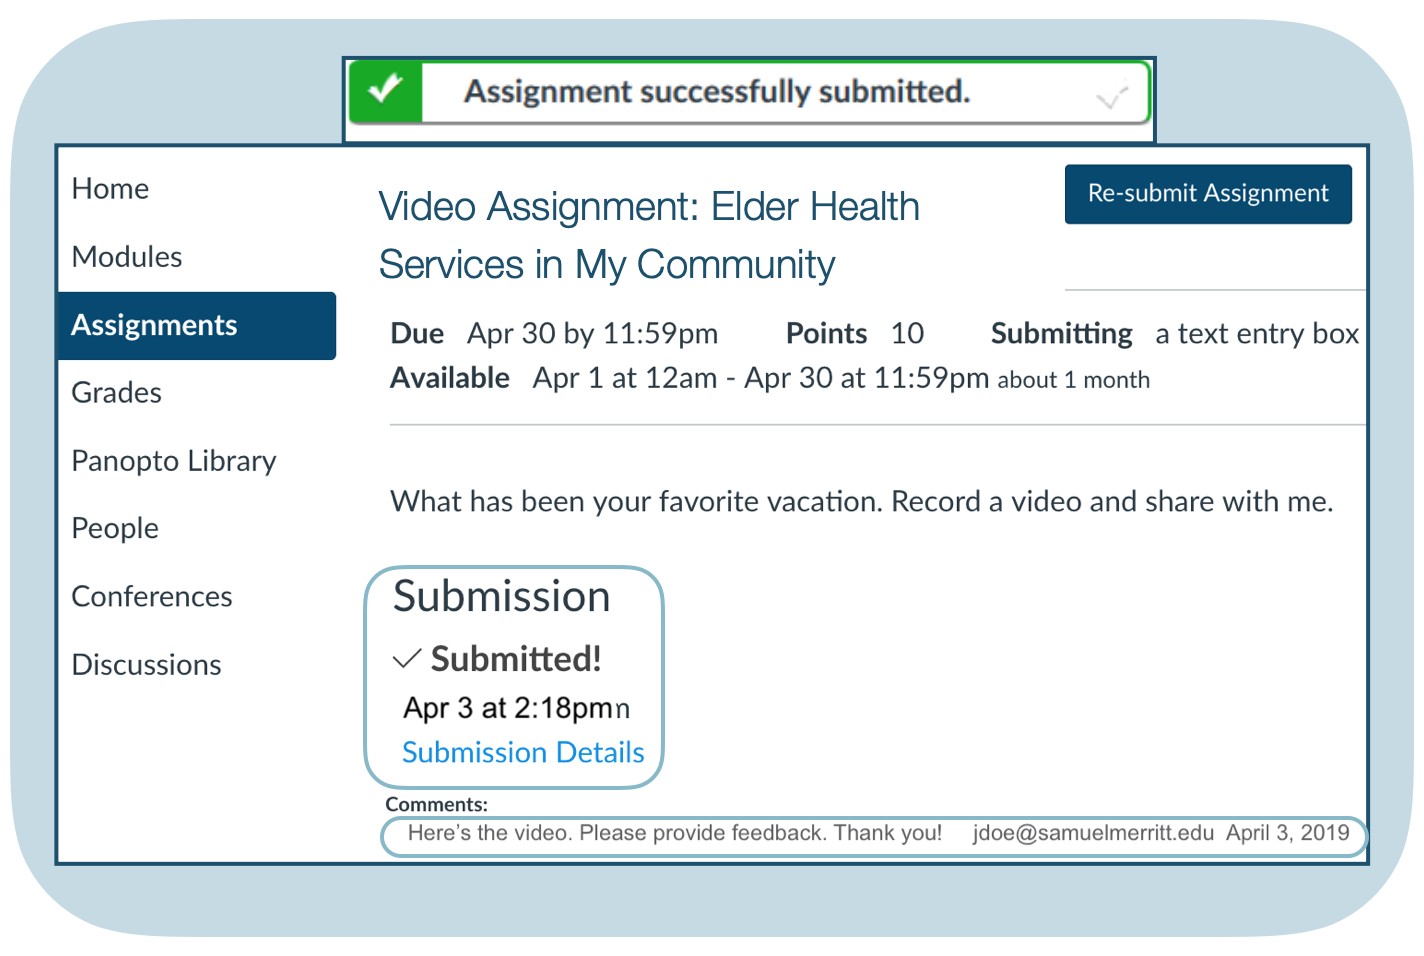
  8. The message “Assignment successfully submitted” will pop up to confirm your submission:


Submit by Recording in Your Computer Panopto App

To record video assignments, do this:

  1. Install the Panopto App on your computer. (PC computer) (Mac computer)
     
  2. Record the Video 
    1. Configure the Panopto Recorder settings (STRAIGHT UP TALK - VIDEO/AUDIO ONLY) 
    2. Consider other recording scenarios:
      • Audio only - see scenario 1
      • Video/audio only (head shot, straight up talk)- see scenario 2
      • Audio only + capture computer screen only - see scenario 3
      • Video/audio + capture computer screen only - see scenario 4

        When configuring the destination folder for the video, choose the course Panopto "Assignments Folder."
         
  3. Submit the video assignment:
    1. Submit the video assignment (if you uploaded the video already to Panopto).
    2. OR, Upload and submit the video assignment (If the video wasn't previously uploaded to Panopto)

*** This tutorial provides the Panopto recorder configuration instructions for scenario #2 (headshot) and for submitting your video.
 

Follow these steps for Recording with Panopto and submitting a Canvas assignment:

  1. Log in to Canvas.
  2. Open your Canvas course.
  3. Open the assignment.
  4. Click “Submit Assignment:”


  5. Select the "Plug" icon in the Rich Content Editor to access the Panopto Library:


  6. Choose the assignments folder for your course by clicking the dropdown menu:


    The “Quick access” list displays all the assignment folders you’ve accessed recently.

    The “All folders” list displays the assignment folder for each course you’re enrolled in (past or present).

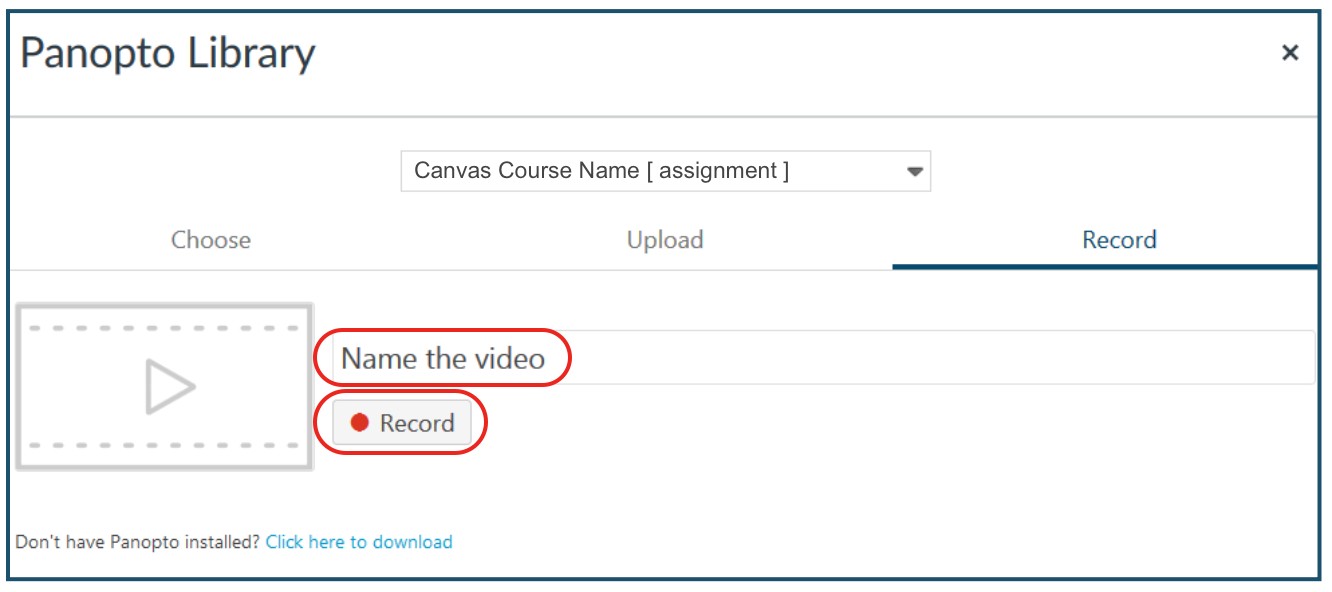
  7. Click "Record".

  8. Name the video and click "Record".

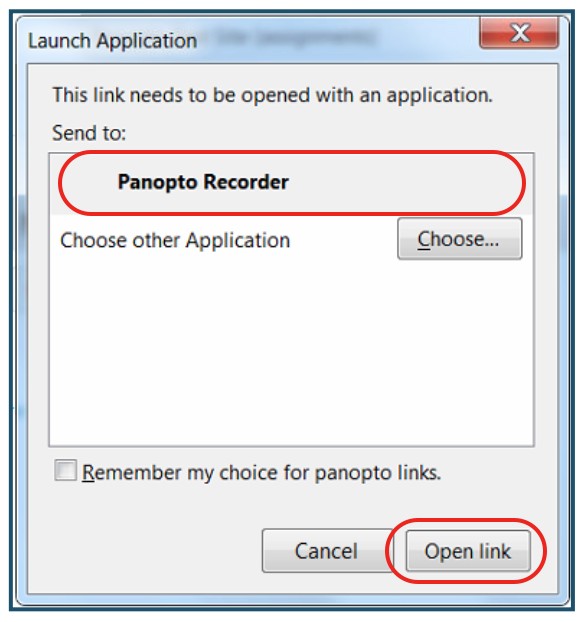
  9. Select "Panopto Recorder" and click "Open Link" to launch the Panopto app on your computer.

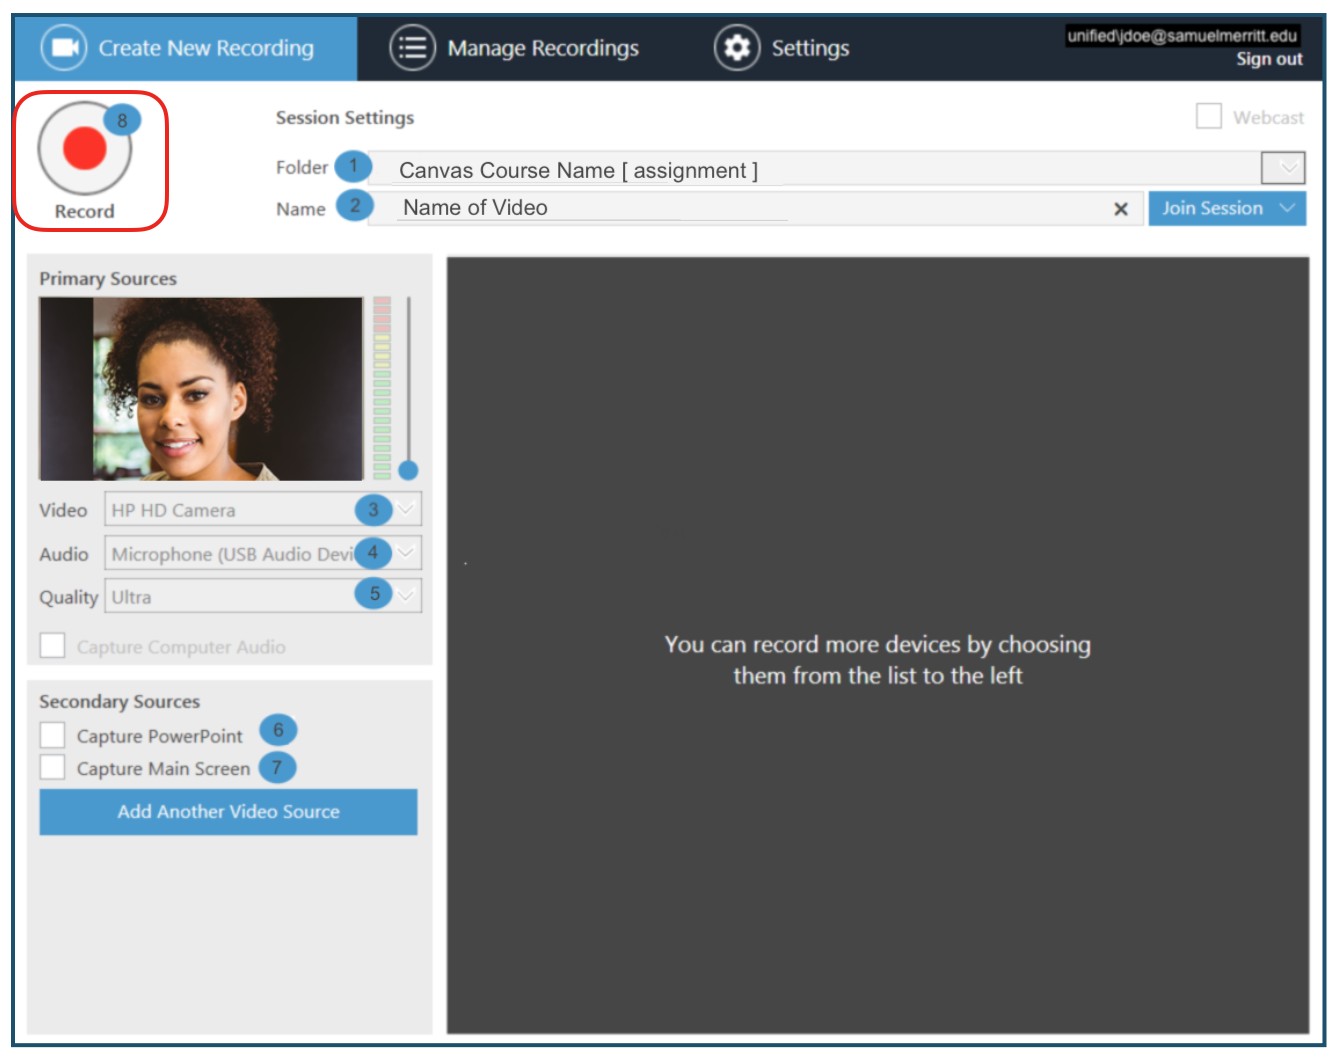
  10. Follow the numbers in the graphic below to adjust Panoto recorder settings for this recording.
     
    Note: These settings correspond to recording video and sound only using the computer webcam.
    For other Panopto recording scenarios click here: 

    (Mac guide) Video/audio only: scenario #2, pg 10; Video/audio+PPT: scenario #4 pg 12
    (PC Guide) Video/audio only: scenario #2, pg 8; Video/audio+PPT: scenario #4 pg 10
     
    1. Folder: The name of the assignment folder you selected should appear here, but if it doesn't, select the folder.
    2. Name: The name of the video you specified should appear here, but if it doesn't, type a name.
    3. Video: Select your computer's webcam.
    4. Audio: Select your computer's internal microphone, or an external mic if you're using one.
    5. Quality: Select "Ultra".
    6. Capture PowerPoint: uncheck.
    7. Capture Main Screen: uncheck
    8. Click "Record".
      1. Wait for the "Recording" (in red) time to start running to make sure you are recording.

      2. Look directly in the Webcam and wait 5 seconds before you start speaking. Project your voice.
      3. If you need to Pause, do not click "Stop" and instead click "Pause". The clock will continue recording, but you'll have time to take a break or recollect your thoughts as needed. If you make a mistake in the middle of a long video, "Pause" and re-state your previous thought or sentence when you "Resume".
         
        Note: The recorder will "edit out" the duration of the "Pause". Once your video is uploaded and processed in Panopto, you can adjust edits. See editing instructions: (text guide) (video guide
         
      4. Click "Resume" when you are ready to continue the recording.

  11. When finished, click "Stop".

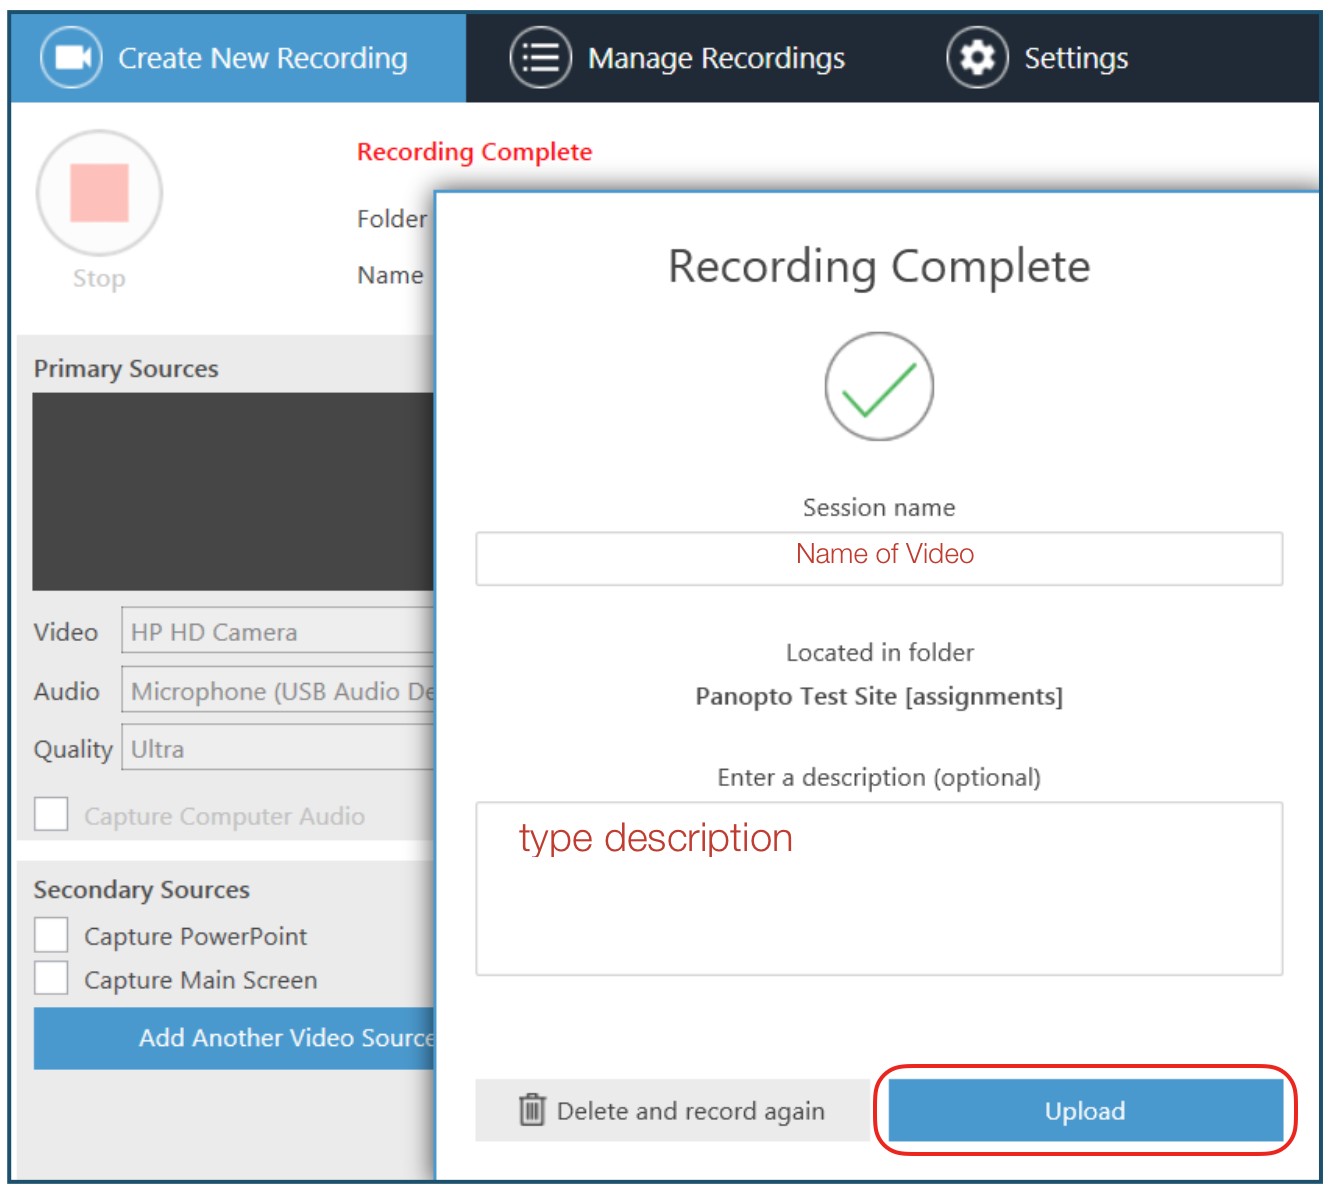
  12. When the message "Recording Complete" pops up, you can rename the video or add a description, then click "Upload". (The video will be uploaded to the "Assignment folder" for the course, in Panopto.)
     
    Note: You can upload a video because you automatically signed in when the Panotpo Recorder was launched. This is because you accessed the Panopto Recorder app through the Canvas course.
    1. "Currently Uploading Recordings" displays "Upload Progress."

    2. "Uploaded Recordings" displays "Processing" video progress.

    3. The video is fully processed. You can access or edit the video if you'd like, but wait until the video has been submitted.
       
      "View" allows playing the video in the Panopto Player.
       
      "Edit" accesses the Panopto editing tool.
       
      If your video does not require editing, proceed to step 13.
       
      If your video requires editing, click here for instructions. After "Publishing" the edited video, resume immediately with step 13 below.

  13. Go back to the web browser with the Canvas assignment (anytime during or after uploading a video, regardless of its status).
    Click "Insert" when it appears.
     
    Note: An empty video thumbnail may appear along with the message “uploading” or “processing” progress. A full video thumbnail will appear once the video is fully processed. Regardless of the video status, click "Insert".


    Here you see a fully processed video that you can submit. Note: You can still click "Submit Assignment" even if a message appears, "You are not able to view video because it's uploading or processing." When video processing is complete, the video will appear as in the below image. But before submitting, go to the next step.

  14. Add a comment for the instructor, then click "Submit Assignment".


    You should immediately receive a record of your submission. See below for green checkmark, submission timestamp, and your commentens.

  15. If you need to re-submit assignment, just click "Re-submit Assignment" and follow the steps above.

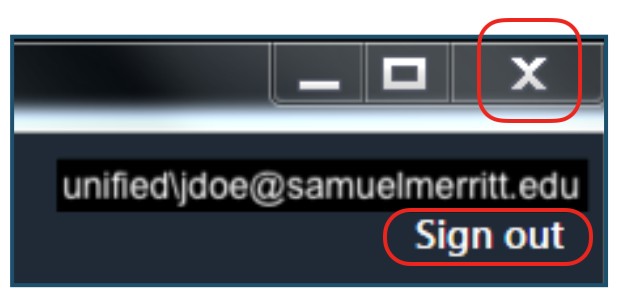
  16. Exit the Panopto Recorder. Click "Sign out" and then click "X".
    1. Once the video is uploaded, you can close the Panopto Recorder app and, if you’d like, sign out. This is because once uploading is complete, the video processing happens in the "cloud." Just make sure the video has completely "Uploaded" before exiting the Panopto Recorder.

    2. If you'd like to delete the recording from your computer:
      1. Open the Panopto Recorder App.
      2. Click the "Manage Reocordings" tab in blue.
      3. Click "Delete Local". Deleting the Panopto session from your computer does not delete your Canvas submission or the video in the Panopto cloud.

Submit by Choosing a Panopto video that's already uploaded in Panopto

Follow these steps:

  1. Log in to Canvas.
  2. Open your Canvas course.
  3. Open the assignment.
  4. Click “Submit Assignment:”
  5. Choose the Panopto Library media option in the Rich Content Editor. (If not visible, click the three lined dots to reveal the "plug icon". Follow the purple line below.)

  6. Choose the assignments folder for your course by clicking the dropdown menu:

    The “Quick access” list displays all the assignment folders you’ve accessed recently.
    The “All folders” list displays the assignment folder for each course you’re enrolled in (past or present).
  7. Click “Choose”
  8. Click the radio button to the left of your video, then click the “Insert” button to send the video to Canvas (you may have to scroll down to see the button):
  9. Type a comment or note to your instructor in the “Comments” box, then click “Submit Assignment:”
  10. The message “Assignment successfully submitted” will pop up to confirm your submission:

Submit by Uploading from Your Computer. The recording is stored in the computer

In this tutorial, you'll learn how to submit a video assignment, where the recording is originally stored in your computer.

(***If your recording is  stored in your mobile device, see the tutorial for uploading and submitting from iOS devices.)

Follow these steps:
  1. Log in to Canvas.
  2. Open your Canvas course.
  3. Open the assignment.
  4. Click “Start Assignment:”
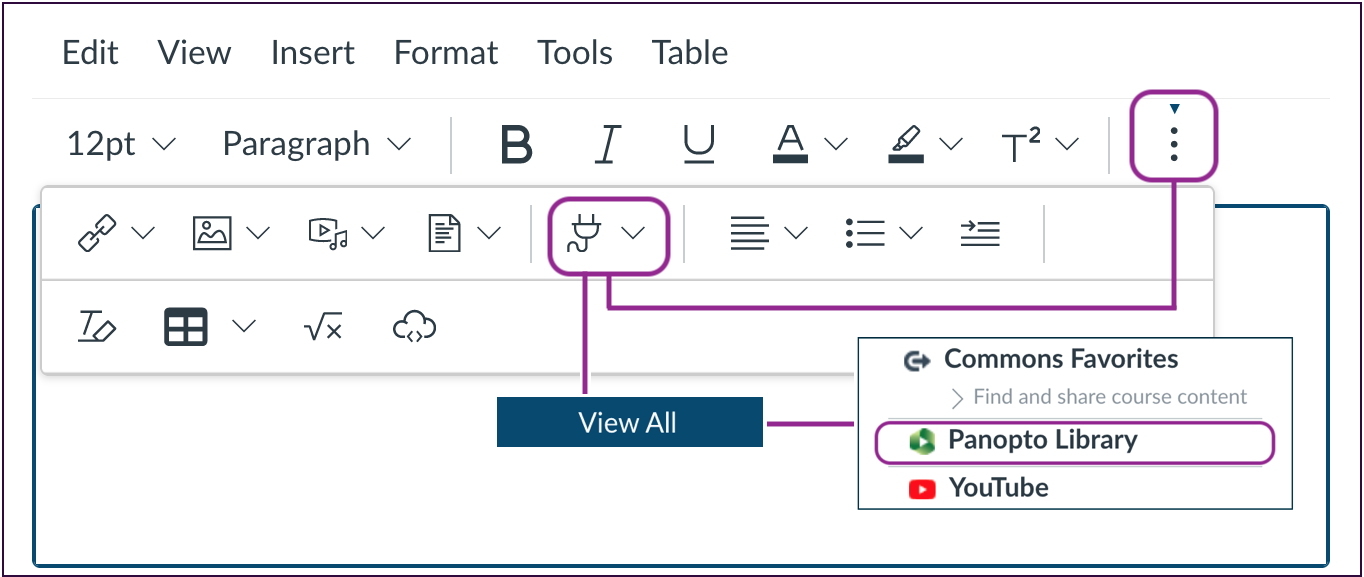
  5.  Choose the Panopto Library media option in the Rich Content Editor. (If not visible, click the three lined dots to reveal the "plug icon". Follow the purple line below.)


  6. Click "Upload."

7.  Choose the "assignments" folder for your course by clicking the dropdown menu:
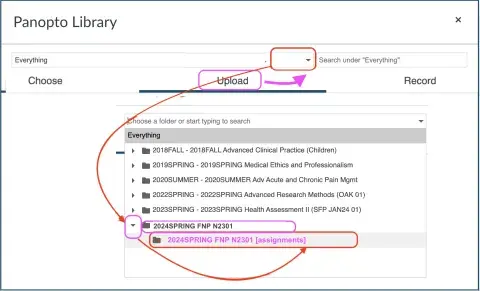
instructions for uploading a panopto video for a video assignment


8.  Click “Choose video or audio files,” browse your computer’s files, and select your video:

After the video has been uploaded, you'll see a “Processing media” message.

video assignment instructions - video processing

10. When the “Insert” button appears, click it to send your video to Canvas.

choose and insert panotpo video in assignment

10.  Type a comment or note to your instructor in the “Comments” box, then click “Submit Assignment:”
Note: You do not have to wait for the video to be fully processed to submit assignment.
 

video assignment instructions - submit assignment


11. The message “Assignment successfully submitted” will pop up to confirm your submission:


Submit by Recording and Uploading from iOS

Watch the tutorial.


Or follow the steps below.

1. Record the video using iOS camera, iOS Clips, or other app.

2. Upload the video to the Panopto Assignment folder for the course 
(using a web browser, not the iOS Canvas app)

  1. Launch the Chrome or Firefox app in your iPad.
  2. Login to MySMU.
  3. Press the Canvas icon until you see a sub-menu panel pop up.
  4. Click "Open in New Tab. (The Canvas dashboard will open in a new browser tab.)
  5. Open the Canvas browser tab.
  6. Open your Canvas course.
  7. Click the Click the “Panopto Library” tab.
  8. Click the assignment "sub-folder" for the course.
    ex:Name of course [Assignment Folder]
  9. Tap the "Upload Media" button.
  10. Tap within the dotted line region to launch browse.
  11. Tap "Photo Library" and choose the video to upload.
    1.  You’ll see the video(s) (a) uploading, (b) processing, (c) publishing.
    2. When “uploaded” is displayed, you can click the “x” (at the top right corner of window) to close. (processing and publishing will happen in the cloud). (if you do not see the “x”, just tap outside the window.
    3. You’ll see the videos processing Canvas / Panopto Library

3. Submit the video assignment

You should be able to continue accessing Canvas browser tab. 

  1. Open the Canvas course.
  2. Open the assignment.
  3. Click “Submit Assignment:”    

    https://www.samuelmerritt.edu/sites/default/files/2019-07/submit_video_assignment_01.jpg    
     
  4. Select the "Plug" icon to access the Panopto Library in the Rich Content Editor:    

  5. Choose the assignments folder for your course by clicking the dropdown menu:    

    https://www.samuelmerritt.edu/sites/default/files/2019-07/submit_video_assignment_03.jpg    

    The “Quick access” list displays all the assignment folders you’ve accessed recently.    
    The “All folders” list displays the assignment folder for each course you’re enrolled in (past or present).    

    https://www.samuelmerritt.edu/sites/default/files/2019-07/submit_video_assignment_04.jpg    
     
  6. Click “Choose”    

    https://www.samuelmerritt.edu/sites/default/files/2019-07/submit_video_assignment_10.jpg    
     
  7. Click the radio button to the left of your video, then click the “Insert” button to send the video to Canvas (you may have to scroll down to see the button):    

    https://www.samuelmerritt.edu/sites/default/files/2019-07/submit_video_assignment_11.jpg    
     
  8. Type a comment or note to your instructor in the “Comments” box, then click “Submit Assignment:”    

    https://www.samuelmerritt.edu/sites/default/files/2019-07/submit_video_assignment_12.jpg    
     
  9. The message “Assignment successfully submitted” will pop up to confirm your submission:    

    https://www.samuelmerritt.edu/sites/default/files/2019-07/submit_video_assignment_09.jpg

Record and Submit using Canvas Media

Canvas Media is an option for shorter video recordings. Canvas restricts videos to 1-2 minutes duration and small file size. For longer videos, use any of the options above.

To record and submit videos using Canvas Media, do this:

  1. Upload a video to Canvas.
  2. Record a video with Canvas Media.

Record with the Apple Clips App on your mobile device

If you have access to an iPad, or an iPhone, you can use the Apple Clips app to record a video selfie, interviews, demonstrations, etc. The videos are saved in "Photos." You'll need to upload your videos to the SMU Panopto Cloud, in the assignment folder for your course, and then submit the video in the Canvas assignment.

Clips is a creative tool for capturing video, adding titles and effects, and editing. Alternately, you can capture video with your iPad camera, and then import then clips in Clips. Then, edit and submit. 

To record your video assignment with Apple Clips, do this:

  1. Record with Apple Clips.
  2. Edit Apple Clips.
  3. Export the video. It will be saved in the Photo library app.
  4. Upload and submit the video assignment in Canvas. (see expandable sections above for options)

Record with your "Camera" App on your mobile device

You can use the camera on your mobile device. Just point it at yourself (selfie) or use the back camera to record record interviews, demonstrations, etc. The videos are saved in "Photos." You'll need to upload your videos to the SMU Panopto Cloud, in the assignment folder for your course, and then submit the video in the Canvas assignment.

To record your video assignments with your mobile camera app, do this:

  1. Access the camera app on your mobile device and record. The videos are stored in the Photo app library.
  2. Upload and submit the video assignment in Canvas. (see expandable sections above for options)

Record with other apps and devices

Optionally, you can use any device or app to record your videos. If you recorded in your computer, the videos are saved to a folder in your computer. If you used a mobile device, your videos are saved to the photo app library, to "files," or to the cloud.  If your videos are saved in a memory card, be sure to transfer the videos to a folder in your computer or mobile device. 

To record with the device and app of your choice do this: 

  1. Record your video.
  2. Save the video to a folder on your computer or mobile device.
  3. Upload to the course Panopto Assignment Folder, and submit your video in Canvas.
    1. See instructions for videos stored in mobile devices in expandable section above.
    2. See instructions for videos stored in computers in expandable section above.

Edit a Panopto Video (after uploading)

For videos already uploaded in Panopto, you have the option to do minor edits using the Panopto Editor web browser (not on the iPad). You can trim the beginning, middle, and end of a video. You cannot swap  or move a segment of the video. To edit, follow the steps in these guides:

Explore other recording and editing resources

You always have the option to use the recording and editing tools of your choice. Take a look at these curated resources:

Add Video and Audio + Screen Capture with Panopto Capture Web Browser 


  1. Open your Canvas course.


  2. Click the "Panopto Library" tab, then click the Panopto [assignments] folder for the course.


  3. Click the "Create" tab, and choose "Panopto Capture."


  4. For recording video+audio only, enable the mic and webcam. Depending on the browser you will either:

        a) click "Allow".
        b) Or, select  the "mic" and "webcam" icons to enable.​

    You're now ready to record video and audio only.


    You are now ready to record video and audio only.


  5. Continue here if you want to RECORD VIDEO AND AUDIO ONLY. 
    (If you want to include screen capture skip this step, and go to step 6)
     
    1. Click "Record" to start recording. (smile and wait 5 seconds before you start talking).


    2. Click "Stop" to end the recording. (smile and wait 5 seconds before you click stop).

      .

      (When you click "stop" go to step 11 to add title your video and to see /or select where the video will be stored).


  6. To configure the recording for VIDEO+AUDIO+ CAPTURE SCREEN (PowerPoint, web browser, computer desktop), continue below.

    Depending on the browser you use, the option features will vary slightly.
     
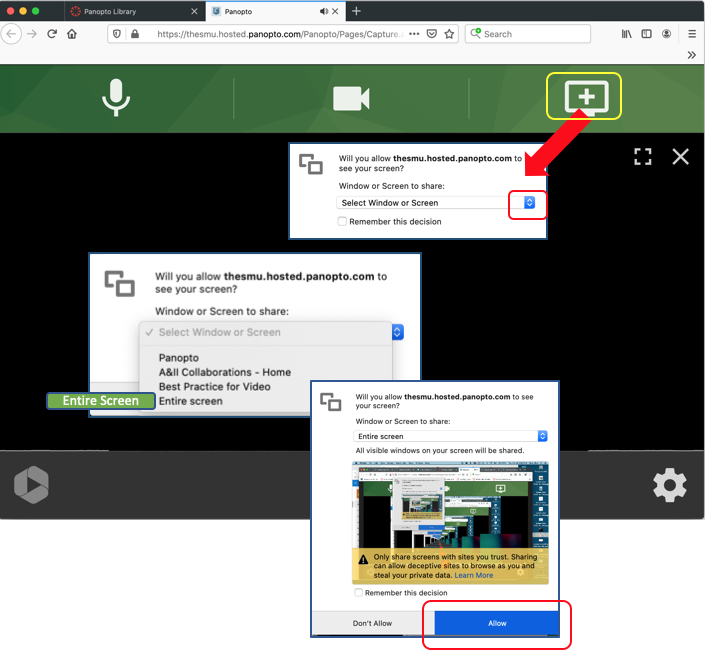
    1. Click the computer screen icon, "+".
    2. Select "Entire Screen" (computer screen) -- (especially if you are using PPT).
    3. Click "Allow" the "Entire Screen" for recording multiple apps and documents; or, the "Window" to show the contents of one of your open "apps" (Word, Excel, web browser, etc... If not sure, select "Entire Screen".
    4. Then, click "Share".


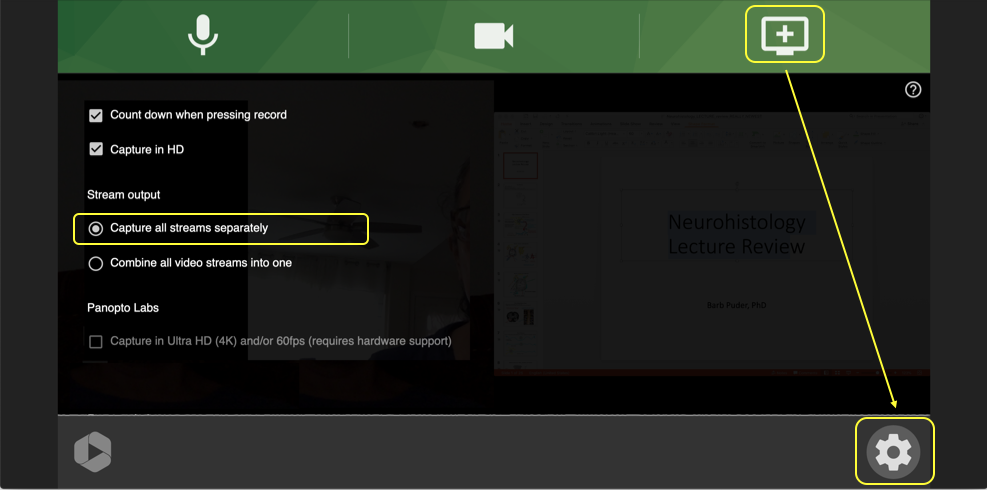
  7. Select how you want to capture streams. (Video/Audio is one stream, screen capture is another stream). Use the recommended settings below:
    1. Click the settings gear at the bottom of the window.
    2. Check "Count down when pressing record".
    3. Check "Capture in HD". 
    4. Select"Capture all streams separately", then click the settings gear to go back to the recording window.
    5. Click the settings gear at the bottom of the window to return to the record mode.


  8. Click "Record" to start recording. (smile and wait 5 seconds before you start talking).


  9. Immediately, set the PowerPoint presentation to slide show (or a website or document to full screen view), and begin narrating and navigating your PowerPoint, or other document.

    (To toggle between PowerPoint, web or documents,  hover over the computer dock at the bottom of your computer screen. This will reveal the apps you're using. Choose the app/document)

     
  10. Click "Stop" to end the recording. (smile and wait 5 seconds before you click stop).

    .
     

  11. While you wait for the video to upload, do this:

    1.  Type the "title" of your video.
    2. Make sure the video is stored in the Panopto[assignments] folder for your course. If not, click the Panopto folder downward arrow and select the correct Panopto folder.
    3. Wait until you see the "it's okay to close" prompt appears above green status bar . The "okay" means the video is fully uploaded.


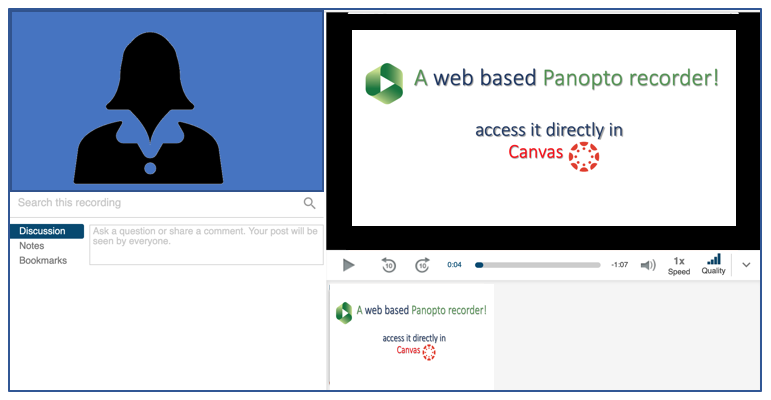
      This is how your Recording (Video/Audio+PowerPoint) will display when playing in the Panopto Viewer:


  12. To access the video, return to the Canvas course, select the "Panopto Library" tab,  open the [assignments] folder for the course. 

Now, see resources to "Post” or “Reply" in a Canvas Discussion, or for "Submitting" a Video Assignment